Overview
If it is enabled for your organization, there will be a link on the event list page named "My Classes" or "My Registrations". The actual text of the link is a configuration option of EKRegistration.
Clicking on that link will prompt you for the password which you entered as part of the registration process.
Entering the correct password will lead you to the list of your registrations.
More about Passwords
Several folks have asked why the password needs to be the same for you to see your registrations. Why not just ask for one of the passwords and then display all of the registrations for the matching email? Two reasons:
- Security - Originally the MyClasses feature worked that way. Then we realized that if some sneaky person wanted to look at your information they could register for an event using your email, select a password that they would know, check my classes and see the event they registered for and all of yours as well.
- Uniqueness - We have some folks who share an email address, e.g. staff@somelibrary.org. Those registrants want to see only their own classes so the password is what makes them unique.
Lost Passwords
Originally, the staff could see the password that a registrant had entered. The feedback we got was that the staff didn't want to see those passwords, often because folks tend to use the same passwords in different applications and the staff didn't want to be responsible for the security of such a password.
On the other hand, the staff needs to be able to do something if a user has forgotten a password. So we chose a fairly common solution which is to make it so an administrator can reset a registrant's password without knowing what the old one was.
Direct Link = www.answerkeeper.com/ekreg_myclasses
Overview
If it is enabled for your organization, there will be a link on the event list page named "My Classes" or "My Registrations". The actual text of the link is a configuration option of EKRegistration.
Clicking on that link will prompt you for the password which you entered as part of the registration process.
Entering the correct password will lead you to the list of your registrations.
More about Passwords
Several folks have asked why the password needs to be the same for you to see your registrations. Why not just ask for one of the passwords and then display all of the registrations for the matching email? Two reasons:
- Security - Originally the MyClasses feature worked that way. Then we realized that if some sneaky person wanted to look at your information they could register for an event using your email, select a password that they would know, check my classes and see the event they registered for and all of yours as well.
- Uniqueness - We have some folks who share an email address, e.g. staff@somelibrary.org. Those registrants want to see only their own classes so the password is what makes them unique.
Lost Passwords
Originally, the staff could see the password that a registrant had entered. The feedback we got was that the staff didn't want to see those passwords, often because folks tend to use the same passwords in different applications and the staff didn't want to be responsible for the security of such a password.
On the other hand, the staff needs to be able to do something if a user has forgotten a password. So we chose a fairly common solution which is to make it so an administrator can reset a registrant's password without knowing what the old one was.
If you have registered for an event in EventKeeper, but need to delete it there are a couple ways to go about that.
First check to see if there is a link called My Classes in the upper left hand side of the screen. If so, then you have the ability to delete your registration online. To see how to do that, please see the instructions below.
If there is no My Classes link, the best thing to do to cancel an event sign up to is call the organization directly. They can delete the reservation for you.
My Classes or My Reservations
If it is enabled for your organization, there will be a link on the pass list page named My Classes or My Registrations.
Clicking on that link will prompt you for your email address and the password which you entered as part of the registration process.
Note: When you register for an event, it is important to enter in the same password every time. In doing so ALL of your reservations will come up when you login to EventKeeper. If you enter in a different password for each reservation, then all of your reservations will not show up in a single list.
Cancelling a Registration
1. Click on My Classes or My Reservations in the upper left hand corner of your screen.
2. Enter in your email address and your password.
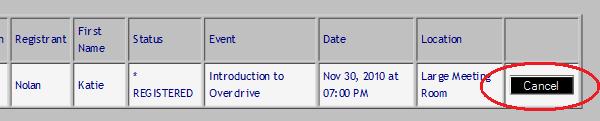
3. You should get a list of your future reservations. Find the reservation you would like to delete and click on the black Cancel button
4. EK will ask if you are sure you want to delete the reservation, click OK.
5. You have successfully deleted a reservation! Now you can close the window.
Direct Link = www.answerkeeper.com/ekreg_cancel
If you have registered for an event in EventKeeper, but need to delete it there are a couple ways to go about that.
First check to see if there is a link called My Classes in the upper left hand side of the screen. If so, then you have the ability to delete your registration online. To see how to do that, please see the instructions below.
If there is no My Classes link, the best thing to do to cancel an event sign up to is call the organization directly. They can delete the reservation for you.
My Classes or My Reservations
If it is enabled for your organization, there will be a link on the pass list page named My Classes or My Registrations.
Clicking on that link will prompt you for your email address and the password which you entered as part of the registration process.
Note: When you register for an event, it is important to enter in the same password every time. In doing so ALL of your reservations will come up when you login to EventKeeper. If you enter in a different password for each reservation, then all of your reservations will not show up in a single list.
Cancelling a Registration
1. Click on My Classes or My Reservations in the upper left hand corner of your screen.
2. Enter in your email address and your password.
3. You should get a list of your future reservations. Find the reservation you would like to delete and click on the black Cancel button
4. EK will ask if you are sure you want to delete the reservation, click OK.
5. You have successfully deleted a reservation! Now you can close the window.
Overview
The instructor class list, or "Class List" for short, was created to let organizations give an instructor limited access to the list of registrants for a class or program. A special login can be created which does not have editing rights and, using this, the instructor can login and see the Class List button and view the list of registrants along with selected information about each registration.
Special Login
If you don't want the instructor to be able to edit events or registration forms, create a login with the TEAM called "TEACHER" and an Editor Post status of VIEW (NO POSTING). If you want the instructor to not see the registrants' phone number and email, regardless of the settings below, create the login with a TEAM name of "LIMITED".
One or Two Lists
The Class List page may show either one or two lists. The first is a list of folks that are actually registered for the class, i.e. where their status begins with an asterisk or is REGISTERED.
If there is a second list, your organization may use a non-registered status such as PENDING, and this list willl show everyone that has filled out the registration form, including non-registered applications. If all applicants are registered, there is no need for the second list and it will not be displayed.
Specifying Data to be Displayed
Most of the data fields in a registration form now have the ability to be displayed in the class list table. The default is to hide them and in order to include them, you need to edit the form and add the ClassListFlag character, which is a caret ("^") at the end of the label for that field.
Missing Emails or Phone Numbers? In previous instances of this page, the registrant's email and phone number were displayed by default. Now, in this new, more configurable version, you need edit the form and add the ClassListFlag ("^") to the end of the labels of the fields that you want to include in the Class List. For example, to make the email field required and have it show up in the class list you would edit the label to say, Email * ^
Number of Participants
If the "Label for number of registrants" field is left blank, the number of registrants will be set to one and the field won't be displayed.
If that field has an entry, e.g. "Number of Adults", the field will be displayed and the number of registrants will be available for the user to fill in.
If that field has an entry and the entry contains an asterisk, e.g. "Number of Adults *", the field will be displayed and will be required.
If that field has an entry and the entry contains the ClassListFlag, e.g. "Number of Adults ^", the field will be included in the table of data on the Class List Page.
Additional Numbers of Participants
This field is useful if you want to keep track of, for instance, of the number of Adults and also the number of Children registered.
The rules for "Label for second (optional) number field" field are similar to those for the first number field, above.
In addition, if the radio button "Add this field to the number of registrants for this form:" is set to yes, the quantity of registrations will be the sum of the two number fields. In addition, the Class List page will include both fields and also the total of the two.
Direct Link = www.answerkeeper.com/ekreg_classlist
Overview
The instructor class list, or "Class List" for short, was created to let organizations give an instructor limited access to the list of registrants for a class or program. A special login can be created which does not have editing rights and, using this, the instructor can login and see the Class List button and view the list of registrants along with selected information about each registration.
Special Login
If you don't want the instructor to be able to edit events or registration forms, create a login with the TEAM called "TEACHER" and an Editor Post status of VIEW (NO POSTING). If you want the instructor to not see the registrants' phone number and email, regardless of the settings below, create the login with a TEAM name of "LIMITED".
One or Two Lists
The Class List page may show either one or two lists. The first is a list of folks that are actually registered for the class, i.e. where their status begins with an asterisk or is REGISTERED.
If there is a second list, your organization may use a non-registered status such as PENDING, and this list willl show everyone that has filled out the registration form, including non-registered applications. If all applicants are registered, there is no need for the second list and it will not be displayed.
Specifying Data to be Displayed
Most of the data fields in a registration form now have the ability to be displayed in the class list table. The default is to hide them and in order to include them, you need to edit the form and add the ClassListFlag character, which is a caret ("^") at the end of the label for that field.
Missing Emails or Phone Numbers? In previous instances of this page, the registrant's email and phone number were displayed by default. Now, in this new, more configurable version, you need edit the form and add the ClassListFlag ("^") to the end of the labels of the fields that you want to include in the Class List. For example, to make the email field required and have it show up in the class list you would edit the label to say, Email * ^
Number of Participants
If the "Label for number of registrants" field is left blank, the number of registrants will be set to one and the field won't be displayed.
If that field has an entry, e.g. "Number of Adults", the field will be displayed and the number of registrants will be available for the user to fill in.
If that field has an entry and the entry contains an asterisk, e.g. "Number of Adults *", the field will be displayed and will be required.
If that field has an entry and the entry contains the ClassListFlag, e.g. "Number of Adults ^", the field will be included in the table of data on the Class List Page.
Additional Numbers of Participants
This field is useful if you want to keep track of, for instance, of the number of Adults and also the number of Children registered.
The rules for "Label for second (optional) number field" field are similar to those for the first number field, above.
In addition, if the radio button "Add this field to the number of registrants for this form:" is set to yes, the quantity of registrations will be the sum of the two number fields. In addition, the Class List page will include both fields and also the total of the two.
522 Direct Link = www.answerkeeper.com/ekreg_classlistCancelling From MyClasses
When someone uses the MyClasses page to cancel a registration, an email with the subject REGISTRATION DELETED is sent to the person whose registration has been deleted and a copy is sent to the staff contact email for that registration form.
In addition, if there is someone on the waiting list who is automatically upgraded to fill the vacancy created by the deletion, that registrant will be notified with an email with the subject of REGISTRATION UPGRADE. The staff contact email for the registration form will be copied on that email as well
Deleting from with the Reports/Email Page
An administrator can delete one or more registrants on the Reports/Email page by checking the box next to the name(s). Then there are 2 choices. If you click on the button Delete Checked (Send Email) the registrant is deleted and the two emails are sent in the same way as described above when cancelling from the My Classes page.
If, however, you click on Delete Checked (No Email) then the deletion takes place and no emails are sent, either to the former registrant or to a new, upgraded registrant.
If you wish to notify upgraded registrants without sending email to the deleted folks, here are the steps. First, before you delete anyone, use the checkboxes to select the folks that will be upgraded after you make room by deleting. Then click on the button, Show Just Checked. Then use the EKREG Mailbutton to send email to that group telling them of the upgrade. When that's done, return to the list, click onShow All, and select the folks to be deleted and click on Delete Checked (No Email).
Direct Link = www.answerkeeper.com/ekreg_email
Cancelling From MyClasses
When someone uses the MyClasses page to cancel a registration, an email with the subject REGISTRATION DELETED is sent to the person whose registration has been deleted and a copy is sent to the staff contact email for that registration form.
In addition, if there is someone on the waiting list who is automatically upgraded to fill the vacancy created by the deletion, that registrant will be notified with an email with the subject of REGISTRATION UPGRADE. The staff contact email for the registration form will be copied on that email as well
Deleting from with the Reports/Email Page
An administrator can delete one or more registrants on the Reports/Email page by checking the box next to the name(s). Then there are 2 choices. If you click on the button Delete Checked (Send Email) the registrant is deleted and the two emails are sent in the same way as described above when cancelling from the My Classes page.
If, however, you click on Delete Checked (No Email) then the deletion takes place and no emails are sent, either to the former registrant or to a new, upgraded registrant.
If you wish to notify upgraded registrants without sending email to the deleted folks, here are the steps. First, before you delete anyone, use the checkboxes to select the folks that will be upgraded after you make room by deleting. Then click on the button, Show Just Checked. Then use the EKREG Mailbutton to send email to that group telling them of the upgrade. When that's done, return to the list, click onShow All, and select the folks to be deleted and click on Delete Checked (No Email).